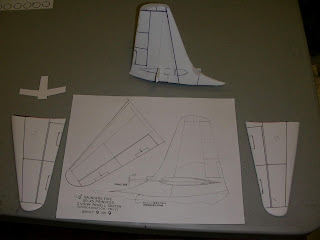
Jim Lund has continued apace with his skilled build of Mike Herrill's recently released kit of the Princess and I have just received this past week's build photo log from Jim showing the latest stages of construction.
Jim say's:
"This week I am working on the tail assembly as you can see in the first picture. This shows the horizontal pieces scribed, rubbed down and ready for gluing together. You can also see the vertical fin and rudder taped together with the cruciform shaped spar installed within it. The aligns the unit and provides the proper dihedral".
"At this point, I would like to show a couple of tools that are handy for vac-form builders to use as they save a lot of time, are easy to use, do a great job yet are relatively cheap to purchase. I have used both of these on the build as you will see, shortly. First up is the Flex-I-File, an indespensable tool for filing areas where access may be a problem or a continuous smooth surface is required eg: on a wing leading edge, or in our case the fin fillet".
"Here is the Flex-I-File in action, sanding the fillet around the fin mounted air intake".
"This image is showing the other excellent tool, namely the 'Profiler' - (Note, this goes under several different trade names but your local D.I.Y. store or hobby store is bound to have one). Basically, it is a series of parallel metal rods held in-line closely together by a retaining (adjustable) bar and the idea is that it will serve to check if both sides of a sanded object, in this case the tail fin, match in profile (hence the name!). It is pushed into the fin as you can see and the fin shape pushes out the metal bars forming an outline of the shape at their ends. This can then be removed, 'flipped over' and placed against the opposite side to check if the outline matches. A simple idea and very effective in use".
"Above, are the tail components, ready for assembly. The cruciform spar template is shown here also".
"So, once sanded and the profiles checked for match each side - port and starboard - the tail unit was bonded (glued) and faired onto the hull. Bear in mind that the size of the tail fin alone is as large as a 1/72 scale jet fighter wing..!"
"Here is another view of the tail fin assembly showing a small amount of Green Stuff filler used to blend the joint in".
"This final image shows a trial fit of the main wing assembly. The next step will be to prime and fine tune the entire wing assembly, before committing to final glueing in place. The wing will not be bonded to the hull until the entire hull and tail have been primed, fine tuned, painted and decaled. In the coming week, I will be scratch building the spinners and building the wing fillets, all of which will be shown in the next instalment".
Wow..! Does'nt she look great..! There is always a certain satisfaction when at last you can see what all the hard effort has been about. Just look at the sheer size of that...!
I saw one once, a scratchbuilt example at a model show, and was blown away at the sheer bulk of it. It brings to mind all the questions about how to support it for the rest of the build, how to handle it without turning it and hitting the adjacent wall and especially how to paint it. You're gonna need a bigger airbrush, Jim!
Regards, SEAWINGS


No comments:
Post a Comment